

Showing posts with label crafts. Show all posts
Showing posts with label crafts. Show all posts
Monday, September 26, 2011
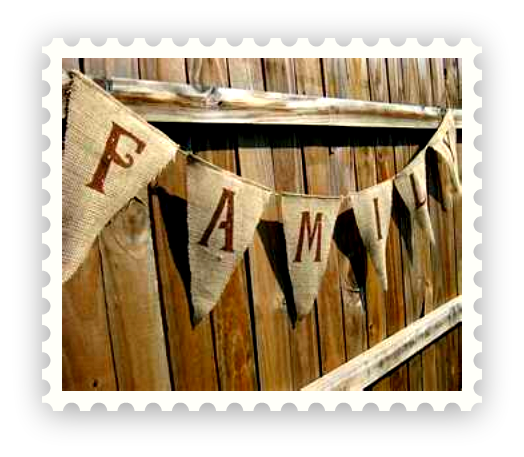
How to: Make a beautifully simple burlap banner that will wow your friends and make your enemies love you!

I usually start surfing the blogs at this time of year, looking for easy projects to do with my kids,ones that look good hanging through thanksgiving. I do love the projects that come home from school, but lets be honest... the glued feathers and pine cones to paper plates usually fall off and start looking shabby a few weeks in. :) (not that I don't LOVE them)
 I have seen a lot of
 burlap banners and
I have fallen in love with them!
The great thing about this project is you can customize the banners to be your own easily! You can make any word, or name.. you can embellish them or leave them simple.
Here are a couple that I love!!

What you will need: (I know...can you believe this is all???)
~1/2 yard of burlap- you can get this at Joane's fabric for around 3 dollars a yard!
~any color of neutral craft paint and foam brush
~black sharpie (Lindsay will have to buy a new one since these are stricken from her new home!) ;)
~Jute or black ribbon
~glue gun
FIRST..
Cut the burlap into triangles any size you want,
I cut them into about 7" tall and about 3" wide triangles

NEXT...
Get your craft paint and wipe on the paint in a triangle shape in the middle of the burlap with your foam brush. I used a tan color....this is so you can use a marker on it without bleeding on the burlap.
Let it dry for about 15 minutes..

THEN...
I chose to use the word "Fall" so I could use it through Halloween and Thanksgiving...I free handed the letters on each banner; I did use a pencil first to make sure they all were the same size, then I just filled them in with the black sharpie. (you can free hand it) my kids just told me my 'L"looks upside down.. but I left it anyway!

LAST BUT NOT LEAST...
When all the letters are done, you can roll out your jute or ribbon and then place your letters about 12" apart, with the letters facing the table, fold the upper part of the banner around the jute or ribbon and glue it down like sealing an envelope. (editors note...don't glue your fingers into the fold like I would do!)
After each one is dry, hang it so all of your friends can ohhh and ahhh in jealousy!!

You can make these for your kids rooms with their names, or for birthdays, holidays, or even weddings!.. so fun and easy!
Mindy is giving away a Joannes Fabric gift card for $10 for one lucky Earth monkey mom reader so you can buy the supplies to make this project!! It's simple to enter...1) "like" her Pretty in Paint FB page, "like" Earth Monkeys FB page (if you don't already) and leave a comment below that you did, and one lucky random reader will be chosen to win!!!
Happy crafting!

For those of you that don't know Mindy... she is the mother of two children, a wife and creator of all that is beautiful~along with her business of making any piece of unloved furniture amazing, she inspires others to try their hand at adding character to their own homes. Her blog "Pretty in Paint" is a fun and inspiring look into her world. You can also find her on facebook at www.facebook.com/prettyinpaint

Facebook Login Labels: crafts, holidays, pretty in paint
Wednesday, August 17, 2011
{Board of Blessings} A flowery kick in the teeth...

Last week on our way home from the water slides (2.5 hours away mind you) the unthinkable happened... dah dah dah... the DVD player broke! (insert horror movie sound effect here) It was tragic, mostly because what followed were hours of "don't touch me, moo-oom he's touching me" ... "don't wook at me... mooo-oom he's wooking at me!""Wap" (that was the sound of monkey #1 hitting monkey#2 with a coloring book) My mom took one look at the crazed mommy expression in my eyes and said... "Remember Costco?" Ugh why is that woman always right?!?!?!?!
So I was in Costco a couple of years ago right after the boys were diagnosed. The checker was talking about how she hates going on road trips with her kids because all they do is fight. I dramatically and quite embarrassingly burst out into uncontrollable tears and totally had a meltdown and told her I prayed for the day my boys would fight because at that time they didn't even recognize each other existed... it's that costco moment that reminds me how blessed I am to have kids that can talk and fight and articulate... and know that they have brothers... so, yes, sibling rivalry can be a blessing!
 |
| Mindy from Pretty in Paint made this little doozie! |
- {Sibling Rivalry...} I guess I'll I just need to repeat costco, costco, costco... over and over in my head so I'm not tempted to pull a Thelma & Louise during what seems to be NEVER-ENDING-FIGHTING! (costco)
- {School Clothes...} My amazing big sister took all three boys shopping today and got them shoes and pants and shirts and socks... who does that?? My big sister!! That's who!:) I love you Abbers!
- {Great Friends...} I swear I have the best friends ever... they love me for me and put up with my non-stop verbal vomit... they are some pretty darn amazing women (and some guys too:)) and I am so beyond blessed to be surrounded by such amazing people!
- {COFFEE!!!} Seriously... this needs no explanation!
- {God's Amazing Grace...} woops maybe I should have put this first... I was a little caught up in my costco moment... But He is so good... all of the time...
- {The right words, when I need them} My hubby just has a way with words... this is what he texted me the other night while I pulled a mini Thelma & Louise at Costco (well I guess it was just a Thelma because Louise was at the coast) ... "You are beautiful... this is the life we GET to live." reminding me that we are so incredibly blessed to be parents to these special boys... even on the rough days.
- {An Amazing Family...} How amazing is it to have a HUGE and by HUGE I mean GINOURMOUS group of relatives that we would actual choose as friends even if we weren't related. We have the best family and don't take any of them for granted for even one second.
OK that's my list for the day.. but mama's gunna keep adding to it... because I know it will help me be a better mom and wife and heck just a better all around person. Being able to focus on the blessing that we have and even using that knowledge to bless others is what makes life worth living... it's what brings joy to heart ache and healing to hurt... and I want that!
{What is your biggest blessing today?}
 Just in case you're new around here I thought I'd introduce myself.... I'm the scattered crazy Earth Monkey Mom Lindsay:) And this is my family. My kids never have clean faces, my house is always dirty and I always have 3-15 loads of unfolded laundry sitting on my couch. I post here on Wednesdays ... Gena the "with it" organized but still whacky EMM posts on Mondays... and then each Friday We have a different guest contributor... always a mom... sometimes funny sometimes inspiring and always real. We're glad you're here and we hope you'll stick around... More than anything we want you to know that none of us have it all together... and wether your kids are 40 or 4 you're not alone in your journey through motherhood!
New To The EMM Blog?
Just in case you're new around here I thought I'd introduce myself.... I'm the scattered crazy Earth Monkey Mom Lindsay:) And this is my family. My kids never have clean faces, my house is always dirty and I always have 3-15 loads of unfolded laundry sitting on my couch. I post here on Wednesdays ... Gena the "with it" organized but still whacky EMM posts on Mondays... and then each Friday We have a different guest contributor... always a mom... sometimes funny sometimes inspiring and always real. We're glad you're here and we hope you'll stick around... More than anything we want you to know that none of us have it all together... and wether your kids are 40 or 4 you're not alone in your journey through motherhood!Friday, July 1, 2011
{DIY Project...} On Sparkle

I have a thing for sparkle! If it sparkles, I’m a fan! A few years ago, my hubby sent me to Ashland Springs Hotel with a few girlfriends to celebrate my birthday with a sleepover. I made goodie bags for my friends and used simple embellishments from the scrapbook aisle to decorate these cute little juice glasses with a monogram initial and a pink stone. I was hooked on how cute it looked.
I started making Bling Mugs out of my desire to inject some sparkle into my very routine and unglamorous life. Gluing Swarovski crystals is a process I’ve gotten down to a science now, but it takes time and the inhalation of some noxious and messy industrial glue, which I would not recommend for a girl’s night or mother/daughter activity.

Pictured above is the project my daughter and I did together at a Chocolate Festival getaway in the spring. It’s an easy, quick and very gratifying project! It also didn’t cost more than $7!
1. I picked up cute acrylic tumblers and some stones (just fancy scrapbook stickers like the ones above) from Target and, washed them, and packed them in my bag to surprise her with a craft. She loves doing anything creative.

2. I laid out our sticker choices-two sizes-and we decorated while we talked. She made one big star shape and I dispersed my stones around the cup’s design. That’s pretty much it; you just have to hand wash these versions.
For a variation (and gifts) your older kids can make for loved ones…buy some “rhinestone” snowflakes, hearts, or flowers and put them right onto a cute glass or cup they picked out. If it’s for Christmas, they can also put a few packets of yummy cocoa, mochas, or chai tea and wrap it up for a special, easy gift for grandparents. In summer or spring time, use the flower type and they can pop in some flower seed packets.
 Making something with your kids is a fun way to spend time and create memories, which last far longer than the art itself.
If you’re having girlfriends over for wine or coffee and dessert, just grab some inexpensive glasses, water goblets, or ceramic mugs and create masterpieces while you catch up.
My daughter, Anneliese, and I such a great night! This inexpensive little souvenir, which sits on my bathroom counter for water, reminds me every day of the wonderful memories we made together in those rare 24 hours alone. Of course, we did buy a little chocolate, too!

You can follow Jami's special brand of chaos on her blog "Moms Flight School", where she uses the written word as a cathartic process for trying to one day let go of her "babies". OR Find her company BLING MUGS on facebook!
{Pssst...We LOVE her Mugs and vases!! Check her out! You will too:)}
Facebook Login Labels: Bling mugs, crafts, daughters, DIY, family, friends, girls night out, guest contributor, Jami Ronda
Friday, April 29, 2011
{DYI Jewelry Box} Gift it -or- keep it for yourself!

Jamie... Jamie's husband and three kids are the most amazing influences in her life - they are her rock, and make her laugh everyday! Creating! This one word shapes up a life that has been shaped by designing, drawing and crafting. Jamie began creating jewelry in the evenings and selling pieces to boutiques to make a little extra money. Her dream came true when she took a leap of faith and started designing full time. 
Shadow boxes are no longer just for hanging collectables in... Here's a fun new way to display your jewels!!!
Project Materials:
Shadow Box (with a pre-existing backing)
Fabric of choice
Spray Paint Color of choice
Screw Driver
Masking Tape
Hot Glue Gun
{1}Shadow boxes come in a variety of shapes, sizes, and prices, so pick one that works best for the space you intend on keeping it and your budget. (I found mine for $10!)

{2}Remove screws, hinges, and inside cardboard backing. Mask off both sides of the glass with masking tape. Now you're ready to spray paint your jewelry box!


[editor's note: MMMM...YES PULLEASE... I will take each Bohemian Jones piece in the example..wowsa... mommy like!]
{A giveaway with a purpose!}
My giveaway this feature is connected to the "Thew Family's Uganda Adoption". Bohemian Jones has teamed up with the Thew Family in their efforts to raise $30,000 in their journey to adopt a deserving baby in Uganda, Africa! There are now TWO Bohemian Jones pieces up for grabs with your generous $5 donation to Baby Thew's adoption! Read more about the Thew Family on their blog at the link provided below!


To donate and be entered into the giveaway, click here: http://maryandnathanthew.blogspot.com/
Both winners will be announced on Bohemian Jones Facebook page on Sunday, May 1st!
Friday, April 15, 2011
{DIY Toys} Secret Mommy Moment... on EMM
 Kimberly... is the mother of two gorgeous boys and the wife of a wonderful man. She is fluent in cloth diapering, homemade baby food, baby wearing, natural parenting, having fun, getting messy, playing games, drinking coffee. Lots and lots of coffee. And spreading peace, joy and positivity to the crazy world of SAHM's! We are so excited to add her to our Earth Monkey Mom Family!
I make toys. I never set out to be a toy-maker. But through a process of parenting evolution, I became one. Every other week we receive a delivery of organic produce and it comes in a cardboard box. I usually found a use for these boxes, but when I didn’t they just got broken down and put in the recycling bin. I think it first happened that my oldest son and I made a robot out of one of the boxes. And then a few months later we made a “car” for him to sit in and watch his favorite movie about some pretty well-known talking vehicles. And then one day I challenged myself to add a bit more skill to my cardboard-box-toy-making adventure and I made an obstacle course for his little toy cars. That project lit the fire (for me AND the boys) and now I make a new toy every week. They are usually (but not always) made of cardboard. It’s a plentifully available material, it’s relatively easy to work with, it’s quite durable (especially when reinforced by my FAVE toy-making item…colored duct tape!) and it recycles when we’re done with it. We have a lot of fun making them and even more fun playing with them!

This toy started with a box that shipped our new oven racks. It’s large and thin – sorta like a big pizza box. I also had an oatmeal container, an empty iodized salt container, and a few paper-towel tubes. I cut my box down the sides so that it would open like a pizza box. (I also shortened the top about 6 inches.) Then I used colored duct tape to cover the raw edges. This makes the toy look nicer and makes it sturdier. I also needed to reinforce the flaps at the back “hinge” with a little hot glue.
 I wrapped and covered my oatmeal, salt and paper-towel tubes in different colors of duct tape. I used 2 of the paper-towel tubes to reinforce the box into an open position. I am always VERY liberal with my hot glue. I made a rather large-ish puddle on either side of the bottom of the box and sat the towel tubes in it. I held them at an angle toward the back for a few seconds while the glue set. Then I flipped the box and repeated that on the top.

Continue your liberal use of hot glue as you glue the oatmeal container (oh yeah, I removed the bottom with my box knife) to the “backboard” area of the box. More liberal hot glue as you make big puddles in the bottom to set your salt container and tube. These two items are for the “ring toss” part of your game board. (I made tossing rings with loops of colored duct tape.) The oatmeal container is for shooting baskets, as in basketball. I added an orange duct tape square above the oatmeal “basket” for looks (and aiming purposes, of course!) The excessive use of hot glue is quite key to making cardboard box toys. When I’ve tried to be stingy with the glue the toys come apart more easily and don’t last as long. When they are solidly adhered with puddles of glue they last WEEKS!

I made duct tape squares on the bottom of the box for a bean-bag-toss area and was planning to make some homemade bean bags to use there. If you chose to use paint instead, you could make regular round “target” looking spots. Before I even got the toy done, my 3 yr. old was using plastic bottle caps from our craft cupboard to toss onto the #’s. He kept tossing them (kind of like skipping rocks…) and if they landed on a square he’d say, “OOohh! I got a number! I don’t know what it is, but I got a number!” I originally thought to number the “scores” 5, 10, 15, 20, etc., but when he started saying that it made me think this could be an opportunity for him to learn what the little number’s LOOK like. (He knows how to count to 5, but doesn’t recognize them in printed form…) So I wrote out #’s 1 through 5 and after only a half hour or so of playing and going over and over the numbers he recognized number 3! (Cheap, easy AND EDUCATIONAL! Win-win!)

The boys using the bottle caps made me think of making some type of small baskets on the “backboard” that they could try tossing the caps into AND that would hold the caps for storage when not in use. So I grabbed a couple of clean, empty yogurt containers, duct taped the outside for looks, then glued them in place.

My philosophy on toys like this is to go crazy! And if, after they’ve played with it a few hours or a few days, you think of something fun to add? ADD IT! That’s what I do. One of the things I like best about cardboard box toys is that if it gets broken, I either fix it or throw it in the recycle! No more fretting over the $30 that was spent and now the toy is a big pile of plastic trash…
So that’s it, Earth Monkey Moms! Go forth and make cardboard toys for your monkeys!
So that’s it, Earth Monkey Moms! Go forth and make cardboard toys for your monkeys!
Check out Kimberly's Secret Mommy Blog at www.secretmommy.blogspot.com and "like" her on facebook HERE!
Don't Forget to {Go Blue} for autism awareness month.. Check out these amazing mother warriors and do your part to spread awareness about autism this month!
Wednesday, February 9, 2011
Antics From The Anti-Martha... Adventures in all Things Domestic... Brace Yourselves!
 |
| In case you can't tell those little dollops of cement are actually burnt cookies. |
You may have heard me refer to myself as the "Anti-Martha" before. It's not a badge I wear proudly, and it's not by choice... it's by DNA. Growing up I think the best way to describe my mom is "June Bundy-Crocker" All of the domesticky goodness of June Cleaver and Betty Crocker with a little Peg Bundy smooshed in the middle to account for her funny sassiness. My sisters are clearly Betty and Junes but apparently Peg was the only one home when I was born ...
I am the first one to laugh at the sad state of my domestic abilities, although my family is not far behind me. I am the one that gets to bring chips and napkins to all of the family functions because I can't be trusted with food people will actually have to consume. Wait, I take that back. I did bring the veggie for Christmas dinner this year. But in true anti martha fashion I forgot I was bringing it and the only think I had was a small head of broccoli to feed about 14. (honestly I was sure my mom had a back up... I mean really? Who would trust me to make "THE" veggie for christmas dinner... I'm sure Mrs. Bundy-Crocker won't make that mistake again:)
Anyway, I thought it might be funny to start a new series called "Antics from the Anti-Martha" here at EMM, where I will actually try to do "Cleaveresk" stuff and document it for your amusement... and also to make other "domestically challenged" women feel better about themselves.
For my first project I wanted to do canning... but Mrs. Bundy-Crocker reminded me that canning is done in the fall... apparently you can after you grow your garden... Then I thought of setting a festive valentines table for my family... until I remembered that we own one dollar store wine glass, a mason jar and about 27,000 kids "black rock" plastic cups.... not real table setting material.
So after about a week and a half of kids puking, coughing and snotting all over the place, a light went off and I knew I needed to start with the basics... Spring Cleaning 101... I was determined to de-germ, de-grime and de-yuckify every square inch of my house. How hard could it be?? Have you seen me? I'm built for hard labor.
{PROJECT #1: De-Funkify my very Funky home}
The morning started by shampooing the carpets and even my son's mattress (yes, that's how bad it got). I felt empowered and ready to conquer more. I did my dishes and wiped my entire house down with hot bleach water. Ok, by this point, honestly I was over wanting a clean house. The only thing that kept me going was knowing that this was my blog post for the week and if I quit I had nothing. So I moved on to the bathrooms...wew I'm getting tired just typing this. After mopping the floors I was just about to throw this stupid "Antics" idea out the window, but a triple americano helped me pull up my big girl undies and start to tackle the three baskets of over flowing laundry.
By 3:00 that afternoon I had decided I really needed to pace myself so I sat down for some quality facebook time until my kids started climbing up my legs 30 seconds later and I realized I had kinda neglected them all day... I resigned myself to putting off the window and wall washing until the next day... I mean really what kind of mother would I be if I let a "clean" house get in the way of me being a caring, nurturing mother... can I get an AMEN... Someone?? Anyone?? Yeah, the laundry still isn't finished and the windows and walls will probably get washed next time we have someone over for dinner.
By 3:00 that afternoon I had decided I really needed to pace myself so I sat down for some quality facebook time until my kids started climbing up my legs 30 seconds later and I realized I had kinda neglected them all day... I resigned myself to putting off the window and wall washing until the next day... I mean really what kind of mother would I be if I let a "clean" house get in the way of me being a caring, nurturing mother... can I get an AMEN... Someone?? Anyone?? Yeah, the laundry still isn't finished and the windows and walls will probably get washed next time we have someone over for dinner.
In my pre-kid days I always bragged that I might be messy but underneath it all was clean... but 3 kids and a hundred pound dog later I am seriously thinking of revoking the 3 second rule (the 10 second rule was revoked years ago)... my house is grimy and gooky and I really don't think my dog should even eat off my floor most days. Challenging myself to deep clean for really no reason at all gave me a sense of satisfaction and a kind of motherly superiority about providing a sterilized germ free(ish) home for my kids to play in. Those 5 minutes my house was actually clean almost makes me want to try this experiment again... almost...
{PROJECT DOCUMENTATION:}
BEFORE...

Picture are purposefully small so you can't see the actual fifth that had taken over my home...
Yes, I am afraid of your judgement...Carry on...
Yes, I am afraid of your judgement...Carry on...
AFTER...

Facebook Login Labels: cooking, crafts, funny, life, Martha Stewart, motherhood, spring cleaning
Friday, December 17, 2010
DIY Framed Chalk Board: A cheap, easy to make gift idea for that annoying friend who has everything... or just spice your own walls up with it!

Mindy is a wife and mom of two, who has turned one of her passions in life into a booming business. She's currently selling her refurbished furniture pieces at two local stores and has her hands full with balancing owning a business AND running her household... like so many of us! She's an awesome mom with LOADS of style and we are so excited to welcome her as a guest contributor on EMM!
I love all things Vintage! Repurposing furniture and old funky "junk" into something i can use is so exciting! Its a fun and fairly cheap creative outlet. I decided on showing you all how to make a chalkboard. I've seen these in antique stores for upwards of 50 bucks! Once you invest in the chalkboard paint, you can make so many fun projects for next to nothing.Supplies:
-Old frame or new if you want (vintage is my fave) you can find them at yard sales for .50!
-Paint (whatever color you want to have the frame be or whatever you can find in the garage)
-Paintbrush
-1/4" plywood cut to size of frame hole (this is the chalkboard)
-Chalkboard paint ~brush on kind or spray on (Lowe's or craft store)
-Glue gun or mirror pins (mirror pins are available at Lowe's)
-Clear spray paint
-Sandpaper (optional)
1. Spray paint your frame black if you want the distressed look if not just paint it the color you pick. Lucky for me this frame was black when i got it for a dollar at a garage sale. Let it dry - around 10 minutes

2. Paint the frame what ever color you want (I chose a cranberry color to be festive... thanks Kim from Saucy Sisters for the color choice!)

3. Have your super handy husband cut your plywood to size. (the size of the inside of the frame) You can also use sheet metal if you want it to be magnetic... I usually stick with wood.

[Editor's Note: OR if you are anything like Gena or me, you will cut the board yourself even if it takes you all day, 20 sheets of plywood, a few choice words and a bottle of wine... because we are annoyingly stubborn, control freaks who want to prove we can do everything ourselves...]
4. Paint the wood with chalkboard paint, I chose black. You need at least 2 coats for this. Painting up and down first then let it dry for about 10 minutes. Then paint left to right and let dry. (You can get the chalkboard paint at craft warehouse or Lowe's, Lowe's tends to be cheaper... around 9 dollars.)

5. Now you can either sand your frame with 100 grit sand paper in random spots (distressing is easy just use a little elbow grease and sand off the top coat of paint until you see the next color) or leave it the solid color you painted it. Either way, you can clear coat it with a satin spray paint when your paint is dry to touch.
6. Attach the wood to the inside of the frame either a hot glue gun or mirror pins. (Mirror pins are available at Lowe's for about $2.00 for 50 of them) But we all have a glue gun in the drawer right?
7. Now just write something festive on it and hang it on your wall!!

After you buy the chalkboard paint, you can easily paint kids table tops for their rooms, or even the back of their bedroom doors! They love being able to draw on the table or back of the door. My daughter is an "artist", she colors and paints all day long. She loves having a chalkboard table, and both my kids love writing on the family chalkboard.
Mindy is giving one lucky Earth Monkey Moms reader this chalkboard!!! IF you share this post on your social network of choice (by clicking the share link below)... and then post a comment to let us know you did...
***If you're interested in checking out more of Mindy's work you can visit her collections at: American Mercantile and the Collectors Market on Court St. in Medford.***
Facebook Login Labels: chalkboard, crafts, DIY, furniture, guest contributor, kids, painting, project
Friday, December 10, 2010
Construction Junction: Crafts from Trash... How Recycley!!

Emilie... is a mom of three boys. She is the founder of both Jackson County Parent to Parent and Families For Community, non-profits that exist to equip parents who have children who experience disability to be the very best advocates for their kiddos that they can be. She began her advocacy work both locally and at a state level in 2007, when her youngest, Parker, was diagnosed with autism. She is immensely passionate about empowering and equipping families experiencing disabilities. She is also a consultant for thirty-one, a company that sells super cute purses, and organizing accessories.
“Almost all creativity involves purposeful play.”
-Abraham Maslow, American psychologist
Construction Junction was something that my mom used to have in her elementary program and she introduced it to my boys this past summer. I am all about providing opportunities for craftiness (I am kind of a craft-whore, don’t judge), and ALL of my boys go nuts when I bring out the Construction Junction box.


Construction Junction is not a new concept, but sometimes as a mom I need to be reminded that certain activities are a great idea. This is one of those great ideas! Construction Junction is the ultimate cold/wet weather indoor activity in our house, and hopefully soon it will be in yours!
Creative people are curious, flexible, persistent, and independent with a tremendous spirit of adventure and a love of play.
-Henri Matisse
Think you have the guts to set you're kids free with a glue gun?? Leave a comment on theEarth Monkey's facebook page about the biggest mess your kids have ever made!! The messiest most creative post wins a FREE Construction Junction starter kit!!
If you're from Southern Oregon and interesting in getting involved with Emilie's advocacy work or supporting Families for Community you can get more information at: www.familiesforcommunity.org
Facebook Login Labels: autism, construction junction, crafts, eco friendly, family, guest contributor, kids, life, recycling
Wednesday, December 1, 2010
Crazy Has Left The Building... at least for a little while...
 |
| Picture by Maria Alexandra Photography |
You would think since last year's activities were filled with tears, shanking attemps, f-bombs and pooping on the floor, I would rethink repeating the same offenses this year... but I am bound and determined to make my kids remember Christmas time as being amazingly special, and magical if it kills me darn-it! Luckily my kids are easily pleased and somehow block out the crazy... and that's just enough to give me hope that this year can be better.
Every year growing up Christmas was magical. My mom just has this way of making everything fun and festive... it seemed so effortless at the time, but now I know with 5 kids and bucket loads of crazy, it was all hard work on her end, and apparently she didn't enjoy a lot of it:):) Anyway, being the "Anti-Martha"that I am makes me the black-sheep of the family in the domestic department. The genetic code that was given to my mom and sisters that makes them naturally wonderful and June Cleavery (well, sometimes June Cleaver on Crack, but still June-Flippen-Cleavery) was not deposited in the Lindsay Bank... it seems like the harder I try to make things special, the worse it gets. Either he kids don't want to join in, or they're fighting or I didn't read the directions (shocker) and put the head where the butt's supposed to be.
The bottom line is, it's not about me... I hate it when that happens. It's not about being perfect or trying to recreate childhood memories. I can't cook or bake like my mom... that's never going to happen... but I can chill out and let my kids just have fun as we create our new family traditions. Who cares if they glue baby Jesus' head to his butt?? Who cares if they just want to sit and color and listen to Christmas music instead of going on the scavenger hunt I spent all flippen day planning... I think as I tone down my crazy and change my expectations the good memories are going to make themselves. (yeah, I know, my corny meter is on extreme high today, I have been watching way too many Hallmark movies...)
So here's my promise to my kids... today as we do our first advent activity, I will stay calm, "crazy mommy" will not make an appearance. When you are all screaming and crying and throwing scissors at each other, I will not drop an F-bomb, when one or two of you decide to remove your diaper and poop on the freshly shampooed carpet I will not scream through gritted teeth... when no one wants to do what I want to do, I will not pout or throw a fit... and at no time in the next 25 days will the words, "MERRY FREAKEN CHRISTMAS" come out of my mouth. I can't promise my treats will be yummy or even edible, heck I might even try reading a recipe... but I do promise to help you see the real reason for christmas... that we give gifts because we we're given the ultimate gift ... and the most important gift I want to give you this year is a Gift Card for a month with out THE CRAZY LADY... (although in January all bets are off). Love Your Guts! ~Mommy, AKA "The Crazy Lady"
[Advent Activity Update... there were tears and poop (not on the floor this time though:)) and fighting, but we made it through without anyone dying ... and "crazy mommy" did NOT show up... yay]


[Advent Activity Update... there were tears and poop (not on the floor this time though:)) and fighting, but we made it through without anyone dying ... and "crazy mommy" did NOT show up... yay]


Facebook Login Labels: activities, advent, Christmas, crafts, family, funny, kids, life, motherhood
Subscribe to:
Comments (Atom)